


Wig Studio 1 News
")
“In Treatment” (Fiber Configurations for Regular Synthetic/Heat Friendly)


Heat Friendly Hair Revised
One major plus regarding heat-friendly hair is the ease at which you can revise the style. For example; beachy waves, whether it be too much or in this case, not enough. This is so often a challenge many of us have encountered when we like a style so much we understandably order it again. Sometimes I want a backup or another color. To the chagrin of myself and many wig sisters, patterns of curl inconsistency abound in wig land.
In this blog/ video we shall embark upon reinforcing and revising a rather limp beachy wave on a very popular style; Caliente HF (heat friendly) by Belle Tress in the gorgeous new color: British Milk Tea.
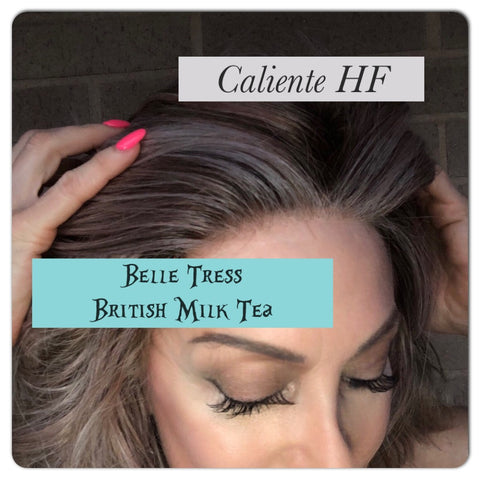
You will need: the patience of a saint, a wig head on which to secure your victim, a rat-tail comb, blow dryer, and either spiral-type Curlformers or a reasonably close item resembling such. (Shown in the video as many options are now available). These types of curlers can be obtained from Amazon in various price ranges and are reusable.
Optional: Estetica Design Sea Salt Spray.
T-pins may be used to secure the wig on the head (not yours). One pin on each ear tab and one pin at the nape area. Avoid going anywhere near the delicate lace front.
Note: Steam will NOT be used. The method depicted is for heat-friendly fibers ONLY. Not to be used on regular synthetic fiber as the dry heat from the blow dryer is too hot in temperature and will fry the fibers on a regular synthetic piece.
It is recommended that the curlers be left in overnight for the curl to cool and set. In closing, thank you for reading and I hope you enjoy the show as we tackle another wig life challenge.
Best,
Michele Pearl

Intervention: Box Hair
At long last! You’ve been stationed at the mailbox, sitting on your beach chair waiting for the UPS driver’s impending arrival; the updated UPS text message informs you that the moment of unmitigated joy is just around the corner. And here she is! You cradle your next acquisition to your ever-growing collection and embark upon the process of disengaging your new hair unit from its packaging.

As you do so, there appears to be a slight issue. Something about the wig seems wonky. The lace front looks perfect, there seem to be no defects whatsoever as you thoroughly examine the piece. Ah, you now come to the realization, your wig has been asleep; more accurately, oversleeping in her box for way too long and now has suffered from the affliction we now know as the dreaded “BOX HAIR”.
Fear not, in this video we will view a Do It Yourself (DIY) Intervention to ameliorate this situation. Our subject for the video demonstration is Arrow by Ellen Wille in the color Platin Blonde Rooted 60.24, regular synthetic fiber. This method is applicable to heat-friendly fiber as well. Arrow was provided to me by Wig Studio 1. Additionally worn by me during a portion of this video is the style Scorpio, basic cap in the color Moonstone by Rene’ of Paris, also available from Wig Studio 1.
I hope you enjoy my intervention video, as I think outside the box on how to wrestle with the box hair challenge. And always remember; if I can do it, so can you.
Best,
MichelePearl

Help! How do I make my wig less wiggy?
The whole point of wearing a wig for most of us is to feel just as beautiful and confident as you did when you had a full head of natural hair, and that is hard to do if you’re worried about strangers whispering, “Is that a wig?” at the office, the grocery store, party or worse still, when meeting someone new. When meeting someone new or preparing for a special occasion, you don’t want to be worrying about your wig.
A good wig is an investment so taking the time to learn before we buy is important. Here are some tips from the experts, information that I have gathered, read, and live by.
1. Replace Your Wig Regularly
The best way to broadcast to the world that you’re wearing a wig is to wear an old ratty-looking wig. Unfortunately, no one has invented a wig that grows new hair yet, so we’re stuck with wigs that lose their quality over time. No matter how hard you wish, no amount of wig styling products or cap adjustments can save a wig that’s past its prime.
Plan to replace your synthetic wigs every 3 to 6 months and your human hair wigs every 6 to 12 months. Use your judgment based on your individual wear patterns.
2. Rooted Colors
Unless you naturally have very dark hair, it’s unlikely that your hair is just one color. Most people have shades of color and gradients (dimension) throughout their hair.
Wigs with one flat color just look fake or look like a bad color job. Wigs with rooted colors, on the other hand, mimic the natural gradients in bio hair by blending several colors.
If you can’t find a wig that you like with rooted colors look for a wig that is a ‘blend’ of two colors or ask a stylist to give your wig highlights and lowlights two shades away from the wig’s base color. (Don’t try this at home if you don’t have training!)
3. Lace Fronts and Monofilament Tops
Lace front wigs create the illusion of a natural hairline, making it look like your wig hair is growing right out of your head. Monofilament tops do the same thing, but for the wig’s part. Each hair of a monofilament top wig is individually sewn into the wig, rather than being machine applied. This allows the wig hair to move freely and lets you part the wig anywhere you want.
4. Mess Up That Part
When something looks too perfect, especially with wigs, it’s usually a sign that it’s fake. Wig companies could and should do a better job with this in my view.
Most wigs come out of the box with eerily perfect parts.
As soon as your new wig arrives, take a pair of tweezers, and carefully pluck out a few strands. Then, using baby scissors, cut a few strands so that they look like they’re just growing out. Last, choose a couple of hairs to place on the ‘wrong' side of the part. (Again, don’t try this at home unless you feel comfortable with your skills.)
5. Trim Your Wig
Or not—but take it to your stylist and get it shaped up to better flatter your face. Some of us have the skill set to do this ourselves, but some of us (uh, me) do not.
6. Blend it Out
If you have some natural hair, try ‘blending’ your natural hairline with the hairline of a lace front wig—as follows:
- Place your wig an inch or two farther back on your head than you typically would, exposing your natural hairline.
- Fully attach the wig to keep it steady and from moving too much.
- pray a little dry shampoo into your hairline and along the wig part line and use your fingers to tease everything together.
- Mimicking your own edges is one major key to achieving a flawless illusion. It keeps people guessing.
NOTE: If you’re going to try this trick, it’s important that your wig color matches your natural hair color.
We’ve all seen the instructions on how to do this and seen the charts on how to determine your cap size. If you are still in doubt look for videos that show how to do this. It’s easier than trying to read the steps. There are many good instruction videos out and cap size charts are easy to find.
8. (For wig Newbies) ALWAYS—line up your wig with your natural hairline.
If you don’t line up your wig with your natural hairline, your wig will never look natural. That’s why it’s so important that each time you put on your wig, you take the time to line it up properly.
To correctly line up your wig with your natural hairline:
- First, put your wig on your forehead just above your eyebrows.
- Next, slowly slide the wig back over your head, adjusting as you go, until the bottom of the wig hits the nape of your next.
- Last, slide the wig forward just a bit until it hits your natural hairline, and secure it in the way you have chosen.
If you have been wearing wigs for a while you have your preferences in place most likely. You love or don’t love heat-friendly wigs; you can’t go without a lace front maybe; you must have a mono top or rooted color—the list goes on. Each wig type, fiber, cap, style, has its own footprint. You may well know the good and the challenges for each type. But whether you must have human hair, heat friendly or not, there always seems to be one question: How do I take the shine out of synthetic wigs without washing them so much? Also, know as:
How to Make a Synthetic Wig Look Real
- In addition to the other things mentioned before (picking one with blended colors, rooted if you like that, there are some additional things you can do while waiting on that shine to go away through washing. *Apply some dry shampoo or talcum powder to the wig but use a light hand at first. You can always add more if needed but it’s hard to take it out without having to wash your wig if you overdo it. And of course, washing your wig more than necessary is something you will want to avoid.
So, until next time --- keep your wigs looking “real” not wiggy. And stop & smell the flowers!
Vickie Lynn

Fixing Fringe Flop
There are many things that can flop in life of which we have no control, however, when it comes to bangs flopping in our face, this video/blog has come to the rescue. For our subject, I have chosen Miss Macchiato HF by Belle Tress in Roca Margarita Blonde. You will need the following:
Patience, a wig head to place your wig on other than your own, 2 to 3 mesh rollers, T-Pins, and a steamer. Optional: Blow dryer, rat-tail comb, and end papers.

Needless to say, this is demonstrated on a wig that has been freshly washed and conditioned for this presentation. After securing your wig, simply section off one front fringe at a time, and carefully roll it up in the mesh roller, you may use end papers but this is not necessary. Proceed to the other side of the wig depending on the style and desired re-direction. Secure the rolled-up sections with T-Pins. Following this, plug in your steamer, I recommend using distilled water or spring water, and when the steam emits you are ready to direct the steam to the rolled-up sections for approximately 5 to 7 seconds. This can be repeated later if necessary. Be careful to avoid the lace front and concentrate the steam only on the fibers. This process can be utilized on both Heat Friendly and Regular synthetic fibers.

The most important point here is the fact that most of the work is done during the cooling down process so I would recommend leaving it to set for a few hours or overnight. If you are in a hurry you can utilize the blow dryer method. Use the low setting on the blow dryer and please take into account that this also needs to dry completely until cool to the touch. If the roller is disengaged prematurely it will not be set.
I hope you enjoy the accompanying video demonstration with the goal of seeing the light at the end of the fringe flopping tunnel.
FYI: I am wearing Kendall by Henry Margu in 10/613GR
Both wigs were purchased by creator from Wig Studio 1 (Clearance Section).
Best,
Michele Pearl

Our Wigs’ Journey
We don’t often think too much about the origin of all the things that we use, consume, or rely on every day. That was true for me about my wigs. I started to do research, and I was fascinated by the history of wig making. While there is so much to tell, I have hit on some highlights here that I thought were particularly interesting. Hope you enjoy a little wig history.
Anthropologists speculate that wigs may have been used as long as 100,000 years ago. Wigs were quite popular among ancient Egyptians, who cut their hair short or shaved their heads in the interests of cleanliness and comfort (i.e., relief from the desert heat). While the poor wore felt caps to protect their heads from the sun, those who could afford them wore wigs of human hair, sheep's wool, or palm-leaf fiber mounted on a porous fabric. An Egyptian clay figure that dates to about 2500 B.C. wears a removable wig of black clay. The British Museum holds a beautifully made wig at least 3,000 years old that was found in the Temple of Isis at Thebes; its hundreds of tiny curls still retain their carefully arranged shape.
During the late eighteenth century, Louis XVI wore wigs to hide his baldness, and wigs were very fashionable throughout France. The modern technique of ventilating (attaching hairs to a net foundation) was invented in this environment.
A little about Methods:
Wigs of synthetic (e.g., acrylic, modacrylic, nylon, or polyester) hair are popular for several reasons. They are comparatively inexpensive (costing one-fifth to one-twentieth as much as a human hair wig). During the past decade, significant improvements in materials have made synthetic hair look and feel more like natural hair. In addition, synthetic wigs weigh noticeably less than human hair versions. They hold a style well—so well, in fact, that they can be difficult to restyle. On the other hand, synthetic fibers tend not to move as naturally as human hairs, and they tend to frizz from friction along collar lines. Synthetic hair is also sensitive to heat and can easily be damaged (e.g., from an open oven, a candle flame, or a cigarette glow).
Human hair remains a popular choice for wigs, particularly because it looks and feels natural. It is easily styled; unlike synthetic hair, it can be permed or colored. United States wigmakers import most of their hair. Italy is known as a prime source of hair with desirable characteristics; other colors and textures of hair are purchased in Spain, France, Germany, India, China, and Japan. Women contract with hair merchants to grow and sell their hair. After cutting, the hair is treated to strip the outer cuticle layer, making the hair more manageable. Wigmakers pay $80 or more per ounce for virgin hair, which has never been dyed or altered in any way. A wig requires at least 4 oz (113.4 g) of hair.
Some manufacturers blend synthetic and human hair for wigs that have both the style-retaining qualities of synthetic hair and the natural movement of human hair. However, this can complicate maintenance, since the different types of hair require different kinds of care.
(Credit for some background to: How Things are Made, Volume 3, 2021.)
I thoroughly enjoyed this video that I have included about the wig-making process and hope that you do too. I am working to get more information on certain individual vendor processes, but that information is tightly held! In the meantime, I hope you learned something, I know that I did.
Until May,
Vickie Lynn